
Body Language Mastery: Elevate Your Self-Introduction Impact
Table of Contents
The Silent Language That Speaks Louder Than Words
Imagine two candidates with identical qualifications, identical introductions, identical everything. One gets the job offer. One gets a rejection email. The difference? Body language.
Research consistently shows that 55% of communication is non-verbal, 38% is tone of voice, and only 7% is actual words. This means that even if your introduction is perfectly written, if your body language doesn’t match your words, people will trust what they see over what they hear.
Here’s what most candidates don’t realize: your body language either amplifies or undermines your self-introduction. When you say you’re confident but you’re avoiding eye contact and fidgeting, interviewers immediately detect the contradiction. They think you’re either dishonest or genuinely nervous despite your confident words—neither impression helps you
The good news? Body language can be learned, practiced, and mastered. You don’t need to be naturally charismatic or outgoing. You just need to understand the specific body language signals that project competence, confidence, and authenticity during your introduction.
The Power Posture: Your Foundation
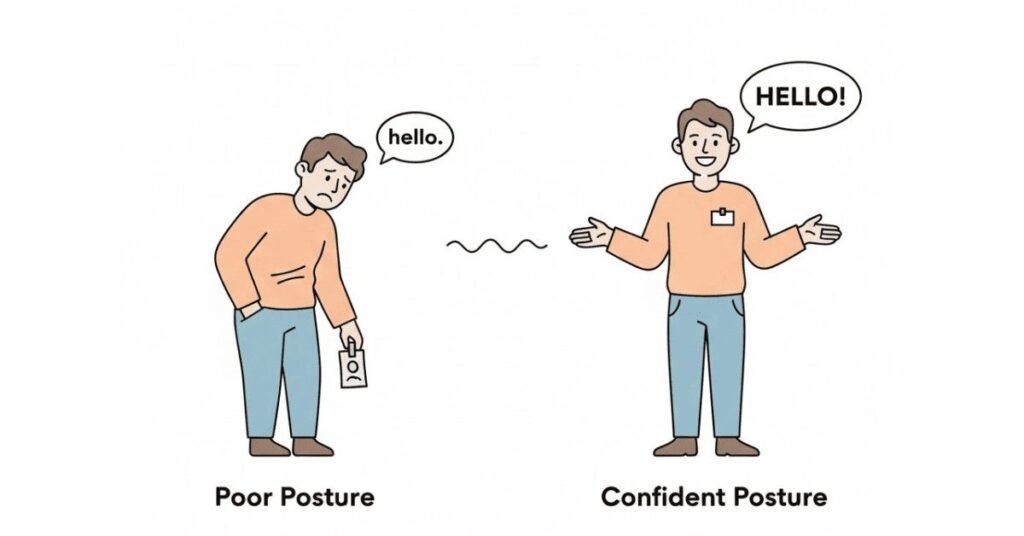
Everything about your body language starts with how you sit or stand. Your posture communicates volumes before you say a single word.
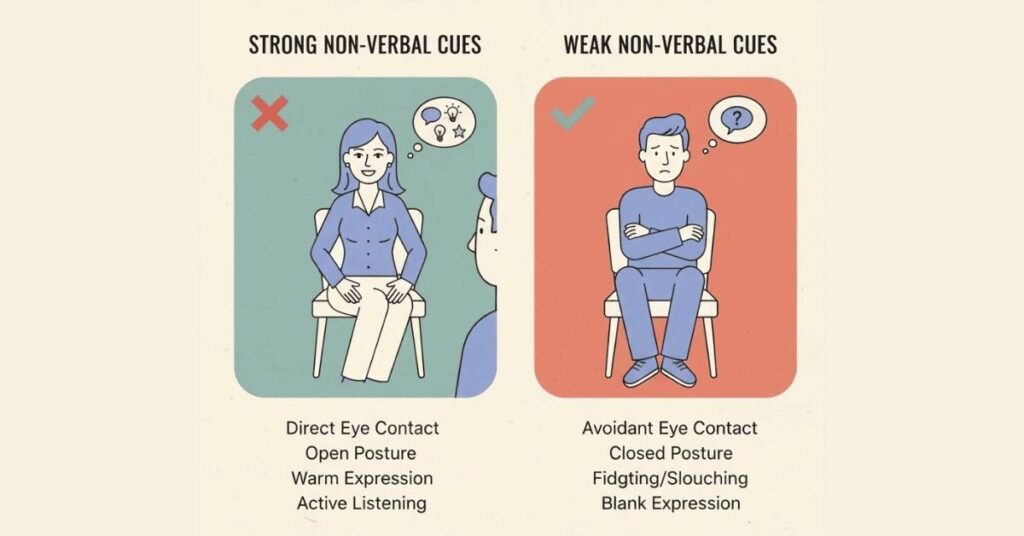
What Poor Posture Signals:
- Slouching, curved spine = lack of confidence, disengagement
- Shoulders hunched = anxiety, defensiveness
- Leaning too far back = disinterest
- Leaning too far forward = aggression or desperation
- Crossing arms = defensiveness, closed-mindedness.
What Powerful Posture Communicates:
- Sitting upright with shoulders back = confidence, professionalism
- Slight forward lean = engagement, interest
- Open chest = approachability, confidence
- Feet flat on floor (sitting) or balanced (standing) = stability, grounding.
The Perfect Interview Posture:
Sit with your back against the chair, shoulders relaxed but pulled slightly back. Your feet should be flat on the floor or ankles crossed (never legs crossed—it can look informal). Keep about 70% of your body weight balanced, leaning slightly forward when emphasizing key points. This signals engagement without looking aggressive.
The Perfect Standing Posture (Networking, GD):
Stand with feet shoulder-width apart, weight distributed equally. Keep your shoulders back and relaxed. Imagine a string pulling the crown of your head upward—this creates natural, confident posture without stiffness. Hands should be visible, resting at your sides or in front of your body, never in pockets or behind your back.
Eye Contact: The Trust Builder
Eye contact is one of the most powerful body language tools, but most people get it wrong.
The Eye Contact Sweet Spot:
In Western business contexts, maintain eye contact 60-70% of the time during your introduction. This means:
- Look directly at the interviewer when making your opening statement
- Look at their eyes for 3-5 seconds, then naturally glance away
- Look back when emphasizing important points
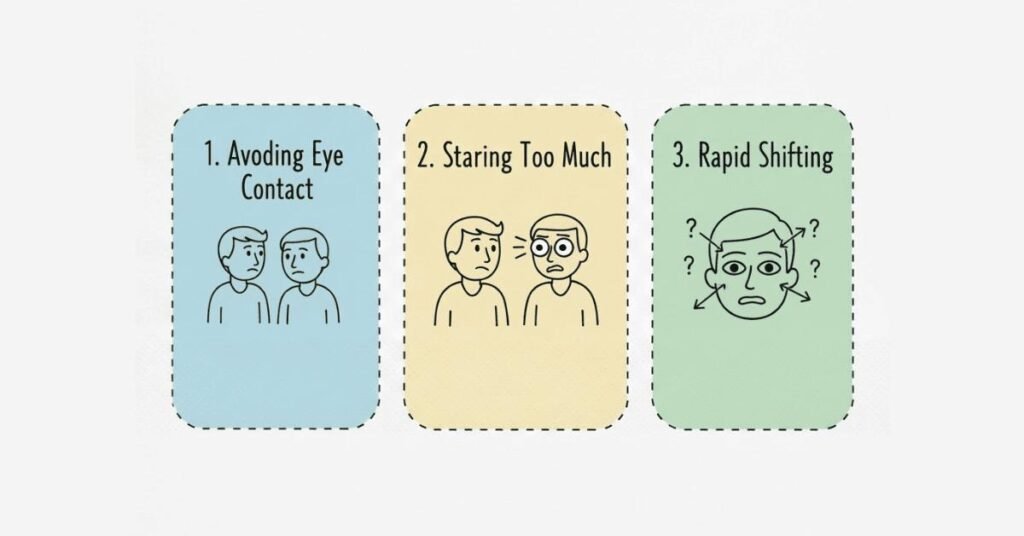
- Don’t stare unblinkingly—it looks aggressive or creepy.
In Multi-Person Settings (Panel, GD, Networking):
Distribute eye contact among all people in the room. When introducing yourself to a group:
- Start by looking at one person
- Make eye contact with 2-3 others as you speak
- End by making eye contact with someone different
- This shows respect and confidence with multiple people.
What NOT to Do:
- Looking down constantly = nervous, untrustworthy
- Looking at the ceiling = dismissive, arrogant
- Looking only at the most senior person = lack of confidence with peers
- Staring at your resume or notes = unprepared, disengaged
Cultural Consideration:
In some cultures, direct eye contact can be considered disrespectful. If you’re interviewing with international companies or from a cultural background where prolonged eye contact isn’t standard, aim for respectful but occasional eye contact—show engagement without violating your cultural norms.
Hand Gestures: Bringing Your Words to Life
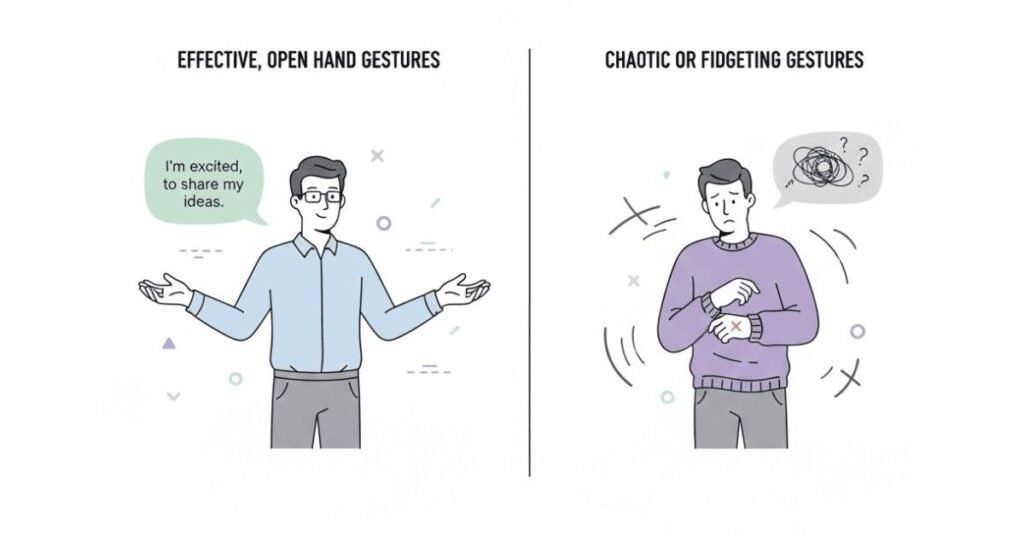
Your hands are powerful communication tools, but they’re often a source of anxiety during introductions.
Effective Hand Gestures Include:
- Open palm gestures: Palms facing upward or outward signal honesty and openness
- Counting on fingers: When listing achievements or points (“I’ve accomplished three things…”)
- Steepling (fingertips touching): For thoughtful moments, shows reflection
- Gesturing at shoulder height: Emphasizing key points
- Controlled, purposeful movement: Not constant flailing.
Where to Place Your Hands When Not Gesturing:
- In interviews (sitting): On the table in front of you, visible and still, or resting on your lap
- In networking events (standing): At your sides or one holding a drink (but not both, which looks closed off)
- During video interviews: Keep them in frame but controlled.
Deadly Hand Gestures to Avoid:
- Fidgeting with pens, papers, or your hair—signals nervousness
- Touching your face repeatedly—appears deceptive
- Wringing hands—extreme nervousness
- Pointing fingers—aggressive, accusatory
- Keeping hands in pockets—defensive, closed off
- Excessive hand movements—distracting, unprofessional.
The Gesture-to-Words Ratio:
Your gestures should complement your words, not overpower them. A good rule: one gesture per key point. If you’re gesturing constantly, you look nervous. If you never gesture, you look robotic.
Facial Expressions: The Personality Window
Your face reveals what you’re really thinking and feeling. Master your facial expressions and you control the emotional narrative.
The Powerful Smile:
A genuine smile (called a Duchenne smile) engages the muscles around your eyes, creating small lines—this is authentic and trustworthy.
During your introduction:
- Smile when greeting the interviewer or group
- Smile when mentioning achievements you’re proud of
- Smile at the end when expressing enthusiasm
- Don’t maintain a frozen smile throughout—it looks unnatural.
Facial Micro-Expressions:
Even if you control your major expressions, micro-expressions (lasting 1/25 of a second) reveal true emotions. If you’re saying you’re excited but your face shows skepticism, people notice the contradiction. Ensure your actual emotional state aligns with your introduction’s content.
Appropriate Expression Levels:
Different settings require different expression intensity.
- Formal interviews: Professional, warm, confident—not overly animated
- Startups or creative roles: Slightly more animated, showing personality
- Serious corporate roles: More controlled, measured expressions
- Networking events: Warmer, more approachable expressions
Body Positioning and Distance
The space you occupy and how you position yourself in relation to others matters more than people realize.
Proxemics in Different Settings:
In One-on-One Interviews:
- Maintain about 2-3 feet distance (the professional zone)
- Angle your body slightly toward the interviewer
- Don’t sit directly across them—angle at 45 degrees if possible (less confrontational)
- Mirror their energy—if they’re relaxed, be relaxed; if they’re formal, be formal.
In Virtual Interviews:
- Position yourself so your head and shoulders fill about 60-70% of the frame
- Ensure you’re centered on screen, not off to one side
- Angle the camera at eye level, not looking up or down at it
In Group Settings (GD, Panel, Networking):
- Don’t monopolize the space
- If sitting, don’t spread out too wide
- When standing, avoid blocking others’ views
Position yourself to see and be seen by everyone.
Nervous Habits That Undermine Your Introduction
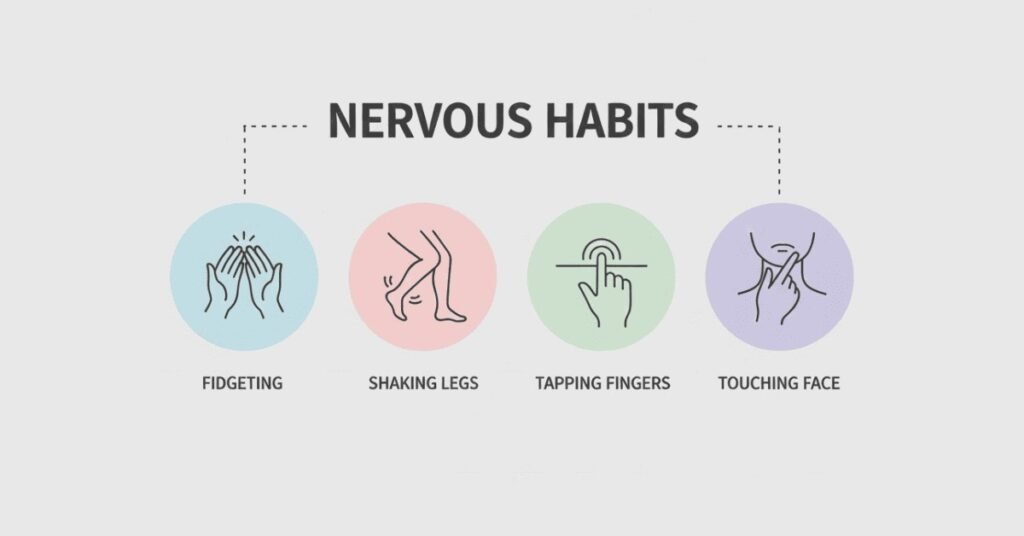
Even one of these habits can destroy your credibility despite an excellent introduction.
The Leg Bouncer: Feet tapping under the table signals anxiety and distracts others.
The Pen Clicker: Clicking a pen repeatedly shows nervousness and irritates interviewers.
The Hair Toucher: Constantly adjusting your hair appears unprofessional and suggests dishonesty.
The Face Toucher: Touching your face, nose, or ears signals discomfort or deception.
The Lip Biter: Shows anxiety and looks unprofessional.
The Foot Shuffler: Moving your feet around when standing signals discomfort.
The Shoulder Shrugging: Frequent shoulder shrugs communicate uncertainty.
The Self-Touch: Hugging yourself or crossing arms looks defensive.
The Complete Body Language Checklist for Your Introduction
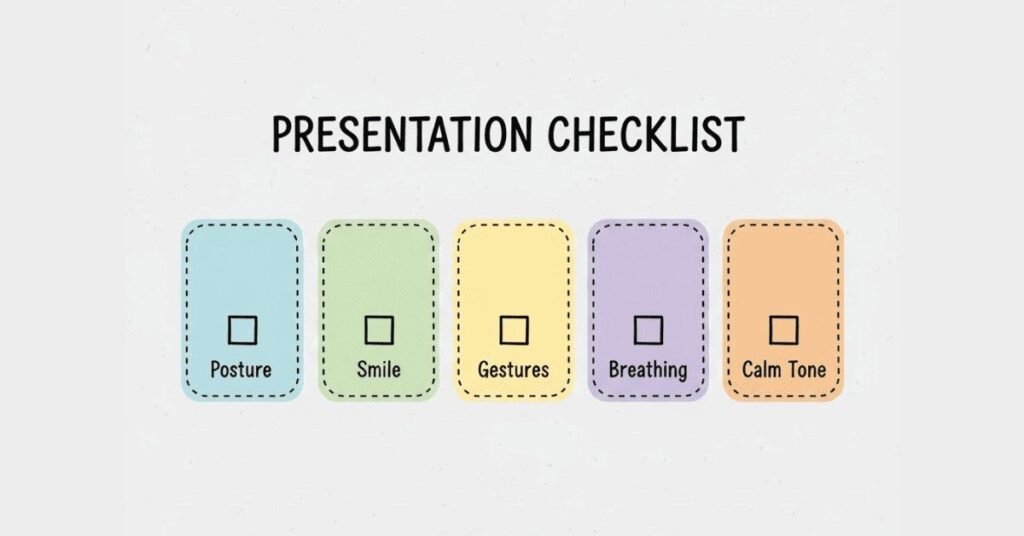
Use this checklist before every interview, networking event, or GD
Before You Enter/Start:
- ✅ Shoulders back and relaxed
- ✅ Feet flat on floor (sitting) or shoulder-width apart (standing)
- ✅ Hands visible and still
- ✅ Face ready with warm expression
- ✅ No fidgeting items in your hands
During Your Introduction:
- ✅ Maintain 60-70% eye contact with speaker(s)
- ✅ Use 1-2 purposeful gestures per key point
- ✅ Keep your body angled toward the listener(s)
- ✅ Smile when appropriate
- ✅ Speak from your diaphragm, not rushed
- ✅ Nod occasionally to show engagement
After Your Introduction:
- ✅ Maintain your posture (don’t slouch)
- ✅ Keep engaged while others speak
- ✅ Don’t immediately check your phone or notes
- ✅ Stay visibly interested in the conversation

Practice Exercises for Body Language Mastery
Exercise 1: Mirror Practice
Record yourself or practice in front of a mirror. Deliver your introduction and observe.
- What’s your natural posture?
- When do you fidget?
- How often do you blink?
- Is your smile natural or forced?
- Do your gestures match your words?
Adjust what doesn’t look authentic or professional.
Exercise 2: Video Recording
Record yourself on your phone, then watch without sound first.
- Do you look confident?
- Are there distracting movements?
- Does your body language match the confidence in your words?
Then listen to the audio and watch together. Do they align?
Exercise 3: The Freeze Test
Have a friend stop you randomly while you’re delivering your introduction. Freeze. Check your body.
- Are your shoulders tensed?
- Is your posture straight?
- Are your hands in a professional position?
- Is your facial expression appropriate?
This reveals your default nervous habits.
Exercise 4: The Handshake Practice
If you’ll be shaking hands.
- Extend your hand at the right angle (not too low, not too high)
- Grip firmly but not crushingly (about 80% of your natural grip strength)
- Shake 2-3 times, not more
- Make eye contact during the handshake
- Smile genuinely.
Common Body Language Mistakes by Situation
In Interviews:
The biggest mistake is making yourself look smaller—slouching, looking down, crossing arms. This signals lack of confidence no matter what you say.
In Networking:
Standing with arms crossed or hands in pockets looks unapproachable and closed off. Open your body language to invite conversation.
In Group Discussions:
Fidgeting or looking at your notes when others speak signals disengagement. Stay visibly interested.
In Virtual Calls:
Constantly looking at yourself or checking your phone signals distraction. Look at the camera when speaking.
The Body Language Transformation
Here’s what happens when you master body language during introductions.
Your interviewer/audience doesn’t just hear that you’re confident—they see it. The coherence between your words and your body language creates trust and credibility. People lean forward instead of back. They take you more seriously. They remember you positively after you leave.
This isn’t about faking confidence you don’t have. It’s about aligning your external presentation with the internal capability you’re claiming to have. When your body language matches your words, you feel more confident, which makes your voice stronger, your thinking clearer, and your impression more powerful.
Your Body Language Practice Plan
This Week:
- Video record yourself delivering your introduction
- Identify 2-3 specific body language habits to improve
- Do mirror practice for 10 minutes daily
- Practice the handshake exercise if relevant
Next Week:
- Film yourself again and compare to last week
- Practice with a friend who gives honest feedback
- Focus on making gestures feel natural, not forced
- Work on maintaining posture under pressure.
Before Your Interview:
- Do a final video check
- Practice your handshake
- Notice your default nervous habits
- Consciously plan to address them
Your body language is the bridge between your words and your credibility. Master it, and you don’t just introduce yourself—you introduce yourself memorably, professionally, and authentically.
That’s when doors open.