
How to Start Online Teaching: A Complete Guide to Earning ₹50,000+ Monthly
Table of Contents

Imagine a world where you can teach your favorite subject to students from across the country, set your own working hours, and build a rewarding career—all from the comfort of your home. This isn’t a distant dream; it’s the reality for thousands of online teachers in India today.
The rise of EdTech has created a massive demand for skilled online tutors. Whether you’re a school teacher looking for a side income, a retired educator wanting to stay active, or a subject expert with a passion for teaching, online tutoring offers an incredible opportunity. But how do you go from having an idea to actually earning a stable income of ₹50,000 or more per month?
This step-by-step guide will walk you through everything you need to know to launch and grow your online teaching career.
Part 1: Why Online Teaching is a Game-Changer
Before we get into the “how,” let’s understand “why” this is such a powerful career move.
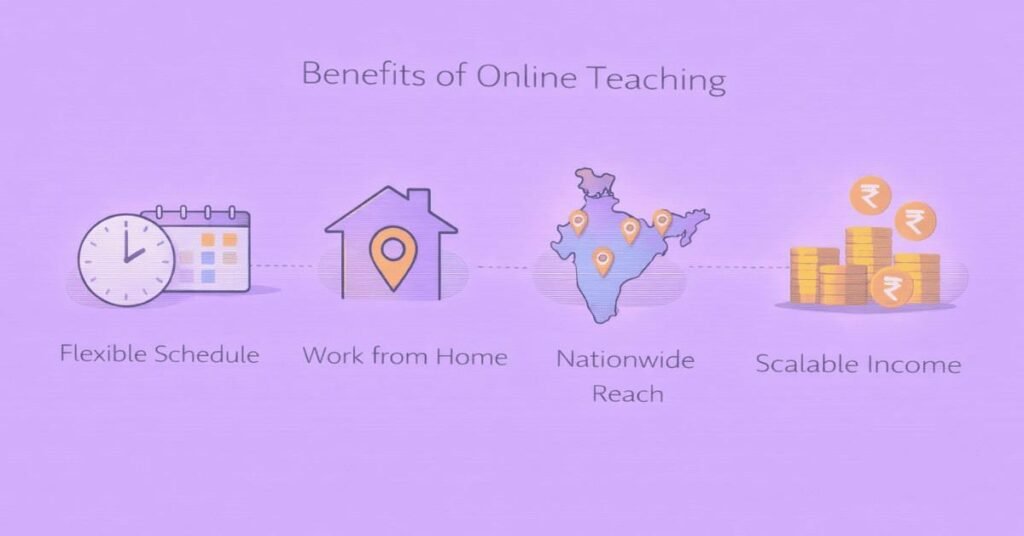
- Flexibility: You are in control of your schedule. You can choose to teach in the evenings, on weekends, or full-time.
- Geographical Freedom: Your students are not limited by your location. You can teach a student in Delhi from your home in Hyderabad.
- Scalability: In a physical classroom, you can only teach 30-40 students at a time. Online, you can teach hundreds (in a webinar) or even thousands (through a recorded course).
Higher Earning Potential: Top online tutors in India earn significantly more than their counterparts in traditional schools, with some making lakhs per month.
Part 2: The Foundation – What You Need to Get Started
You don’t need a fancy studio to start. You just need a few key things.
1. Your Niche and Subject Expertise
First, decide what you will teach and who you will teach. Being specific is key. Instead of “I teach Math,” a better niche would be “I help Class 10 students master CBSE board exam Math problems.”
Popular Niches:
- K-12 Subjects: Math, Physics, Chemistry, Biology for grades 6-12.
- Test Preparation: JEE, NEET, CAT, UPSC, Bank PO, UGC NET.
- Hobby Classes: Guitar, Keyboard, Painting, Creative Writing, Public Speaking.
- Language Learning: English, French, German, Spanish.
- Professional Skills: Digital Marketing, Coding, Data Science, Stock Market Trading.
Your niche should be a combination of what you are an expert in, what you are passionate about, and what people are willing to pay for.
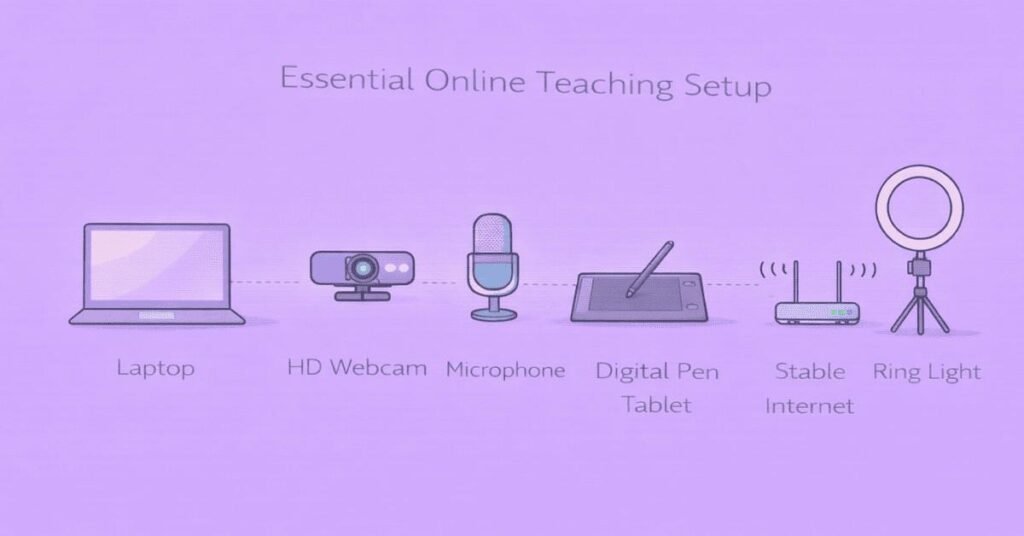
2. The Essential Tech Setup
Your technology is your classroom. Here’s the minimum you’ll need:
- A Good Laptop or Desktop: With a decent processor (i5 or equivalent) and at least 8GB of RAM.
- A Stable Internet Connection: This is non-negotiable. A broadband connection with at least 30-50 Mbps speed is ideal. Always have a mobile hotspot as a backup.
- A High-Quality Webcam: The built-in webcam on your laptop is often not good enough. Invest in an external HD webcam (like Logitech C920).
- A Clear Microphone: Good audio is more important than good video. A USB condenser microphone or a quality headset with a mic will make a huge difference.
- A Digital Writing Pad (Pen Tablet): If you teach a subject that requires writing or drawing (like Math or Science), a digital writing pad (from brands like Wacom or Huion) is essential. It allows you to write on a digital whiteboard just like you would on a physical one.
- Good Lighting: A simple ring light placed behind your webcam can dramatically improve your video quality and make you look more professional.
3. Choosing Your Teaching Platform
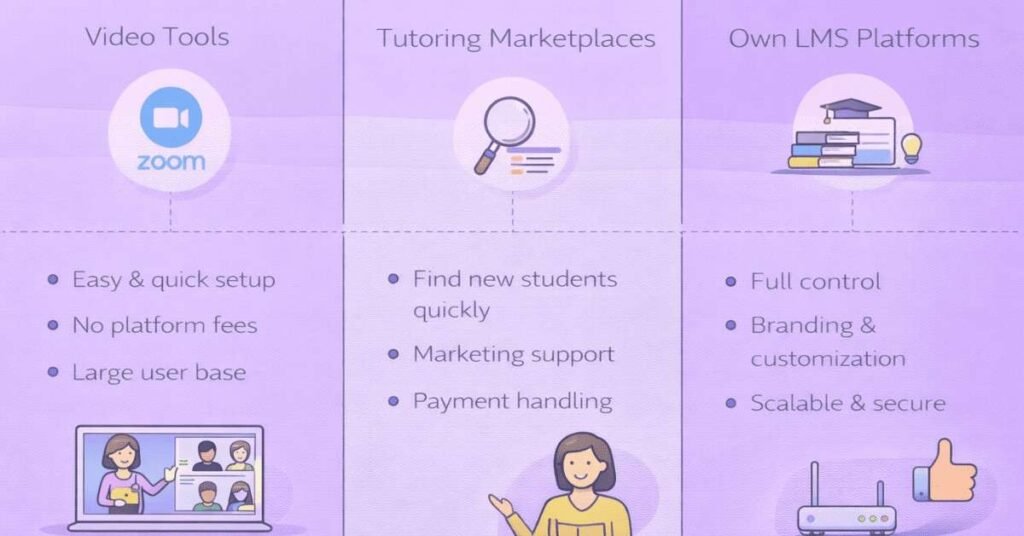
This is where you will conduct your classes. You have three main options:
Option A: Simple Video Conferencing Tools
- Examples: Zoom, Google Meet, Microsoft Teams.
- Pros: Easy to use, most people are familiar with them, and they have free versions.
- Cons: You have to handle payments, scheduling, and communication separately.
- Best for: Beginners who are just starting with a few students.
Option B: Online Tutoring Marketplaces
- Examples: Vedantu, BYJU’s, Unacademy (as a platform educator), UrbanPro, MyPrivateTutor.
- Pros: They bring students to you, handle marketing and payments, and provide a structured platform.
- Cons: They take a significant commission (20-50%) of your earnings, and you have less control over your branding and pricing.
- Best for: Teachers who want a steady stream of students without worrying about marketing.
Option C: Your Own Branded Platform (LMS)
- Examples: Teachable, Thinkific, Graphy (by Unacademy), or your own website with a plugin like LearnDash.
- Pros: You keep 100% of your revenue (minus payment gateway fees), you have complete control over your brand and pricing, and you can build a long-term asset.
- Cons: You are responsible for all the marketing, technology, and administration. Requires more initial effort.
- Best for: Established teachers who have a following and want to build a scalable business.
Recommendation for Beginners: Start with a simple tool like Zoom and manage a small group of students. As you grow, you can explore creating your own course on a platform like Graphy.
Part 3: Pricing Your Classes – How Much to Charge?
This is one of the hardest questions for new tutors. Here’s a framework to help you decide.
- Research the Market: See what other tutors in your niche are charging on platforms like UrbanPro.
- Consider Your Format:
- One-on-One Classes: This is the most personalized format and should be priced the highest. Rates can range from ₹500 to ₹2,000 per hour depending on the subject and grade level.
- Small Group Classes (4-10 students): This is the sweet spot for many tutors. You can charge less per student but earn more per hour. For example, charging ₹500/hour for a group of 5 students earns you ₹2,500/hour.
- Large Group/Webinar Classes (20+ students): Here, you charge a much lower monthly fee per student (e.g., ₹1,000 – ₹3,000 per month), but you can scale to a large number of students.
- One-on-One Classes: This is the most personalized format and should be priced the highest. Rates can range from ₹500 to ₹2,000 per hour depending on the subject and grade level.
- Factor in Your Experience: If you are a highly experienced teacher with a proven track record, you can command a premium price.
Beginner’s Pricing Strategy: Don’t underprice yourself. It’s harder to raise prices later. Start with a reasonable mid-range price for your niche. For example, if you’re teaching Class 10 Math, you could start with a monthly fee of ₹2,000 – ₹4,000 per student for group classes held 2-3 times a week.
Part 4: Getting Your First Students – The Marketing Plan
You can be the best teacher in the world, but if no one knows you exist, you won’t have any students.
Phase 1: Your Immediate Network (The First 1-10 Students)
- Word-of-Mouth: This is the most powerful marketing tool. Let your friends, family, neighbors, and old colleagues know that you are starting online classes. Your first few students will almost always come from referrals.
- Local Community Groups: Post a well-designed flyer in your local apartment complex WhatsApp group or on local Facebook community pages.
- Offer a Free Demo Class: This is the best way to convert interested leads into paying students. A 30-minute free session allows students and parents to experience your teaching style, see your professionalism, and build trust.
Phase 2: Building an Online Presence (The Next 10-50 Students)
- YouTube Channel: This is a non-negotiable for online teachers. Start a YouTube channel where you teach small concepts from your subject. You don’t need fancy editing. Just use a screen recording tool (like OBS Studio or Loom) and your digital pen tablet. Consistently posting high-quality, helpful videos is the single best way to attract students. Title your videos with keywords students are searching for (e.g., “How to solve quadratic equations Class 10”).
- Social Media: Use Instagram or Facebook to share short educational tips, student testimonials, and announcements about your classes. Use relevant hashtags like #onlinetutoring #cbsemath #neetpreparation.
- Tutoring Marketplaces: Create a strong profile on platforms like UrbanPro and MyPrivateTutor. Get your existing students to leave positive reviews to improve your visibility.
Phase 3: Scaling Your Business (50+ Students)
- Build a Website/Landing Page: Create a simple one-page website that details your courses, includes testimonials, and has a clear “Enroll Now” button.
- Run Targeted Ads: Once you have a proven offer and positive testimonials, you can consider running targeted Facebook or Google ads to reach a wider audience.
Create a Recorded Course: Take your most popular live course and record it. Sell this recorded course on your own platform (like Graphy) for a lower price. This creates a passive income stream.
Part 5: A Day in the Life – Managing Your Online Teaching Business
Being a successful online tutor is about more than just teaching. You are also a business owner.
- Content Preparation (30%): Planning lessons, creating presentations, and preparing notes.
- Live Teaching (30%): The actual time you spend conducting classes.
- Marketing & Administration (20%): Creating YouTube videos, responding to inquiries, managing payments, and communicating with parents.
- Review & Feedback (20%): Grading assignments and providing personalized feedback to students.
Pro Tip: Use tools to automate your administrative tasks. Use a scheduler like Calendly for demo classes, use Google Forms for quizzes, and use a payment gateway like Razorpay or Instamojo to collect fees easily.
Part 6: The Path to ₹50,000+ per Month – A Realistic Calculation
Let’s do some simple math to see how achievable this goal is.
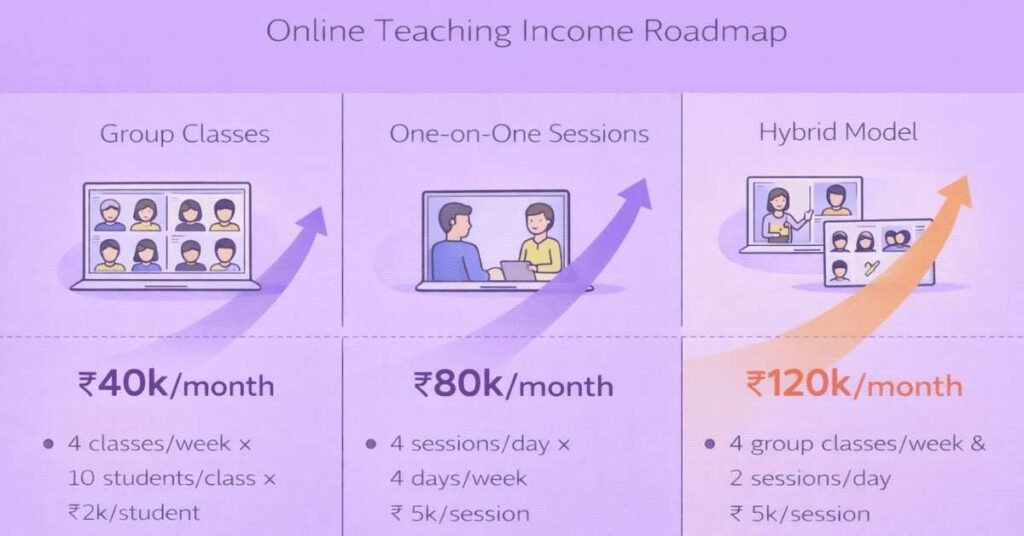
Scenario 1: Small Group Classes
- Your Course: Class 10 Math, 3 classes per week.
- Your Fee: ₹2,500 per month per student.
- Goal: To earn ₹50,000 per month.
- Students Needed: ₹50,000 / ₹2,500 = 20 students.
- Structure: You could run two batches of 10 students each. This is a very achievable target within 3-6 months for a dedicated teacher.
Scenario 2: One-on-One Classes
- Your Rate: ₹800 per hour.
- Goal: To earn ₹50,000 per month.
- Hours Needed: ₹50,000 / ₹800 = 62.5 hours per month.
- Structure: This translates to about 15-16 hours of teaching per week. You could manage this with 3-4 dedicated students taking multiple classes per week.
Scenario 3: The Hybrid Model (The Best Approach)
- Live Group Classes: 15 students x ₹2,500/month = ₹37,500
- One-on-One Sessions: 5 hours/week x ₹800/hour x 4 weeks = ₹16,000
- Total Monthly Income: ₹53,500
This hybrid model allows you to have a stable income from group classes while earning a premium from a few one-on-one students.
Final Thoughts: Your Journey Starts Today
Online teaching is not a get-rich-quick scheme. It requires subject expertise, professionalism, and a genuine desire to help students succeed. But for those willing to put in the effort, it offers a level of freedom, impact, and financial reward that is difficult to match in traditional education.
Start small. Get your tech setup right. Find your first student. Deliver an amazing learning experience. The rest will follow. Your journey to becoming a successful online educator, earning a stable and respectable income, begins now.